Introduction
Welcome to 3D Graphics on Android
Mobile devices can render complex 3D scenes in real time. This tutorial shows how to build an interactive 3D solar system viewer for Android using OpenGL ES 3.2.
What You'll Learn
This tutorial covers:
- OpenGL ES fundamentals: setup, rendering pipeline, state management
- 3D mathematics: coordinate systems, transformations, camera math
- Shader programming: GLSL vertex and fragment shaders
- Geometry generation: creating 3D meshes programmatically
- Texture mapping: loading and applying textures
- Touch interaction: handling gestures and camera control
- Performance: monitoring and optimization
Prerequisites
- Basic Android development (Activities, Views, Layouts)
- Java fundamentals
- Basic math (trigonometry, vectors, matrices)
- No prior OpenGL experience required
Table of Contents
- App Overview
- Architecture & Components
- OpenGL ES Setup
- 3D Sphere Geometry Generation
- Shader Programming
- Texture Loading System
- Rendering Pipeline
- Touch & Gesture Handling
- UI Components & Layout
- Loading Screen & Particle Animation
- Planet Information System
- Camera System & Transitions
- Performance Monitoring
App Overview
A 3D solar system viewer built with OpenGL ES 3.2. Features:
- Interactive 3D planets with textures
- Touch controls (rotate, zoom, swipe to switch planets)
- Real-time planet rotations and orbital motion
- Planet information dialog
- Performance metrics display
- Smooth camera transitions with motion blur
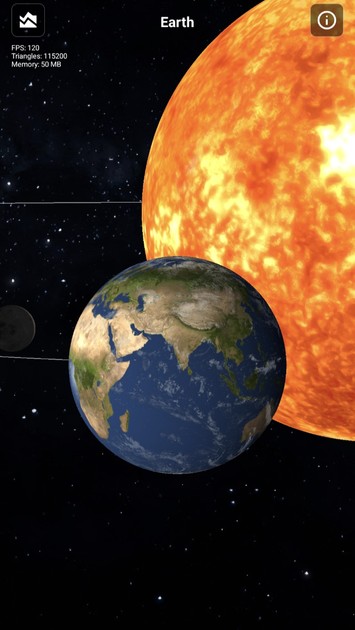
Screenshot of the Demo
Architecture & Components
Core Classes
- MainActivity.java — Main activity managing UI and lifecycle
- SurfaceView.java — Custom GLSurfaceView handling touch/gestures
- Renderer.java — OpenGL renderer managing the 3D scene
- Sphere.java — Sphere geometry and shader management
- TextureHelper.java — Texture loading utilities
- ParticleView.java — Loading screen particle animation
- PlanetData.java — Planet information data class
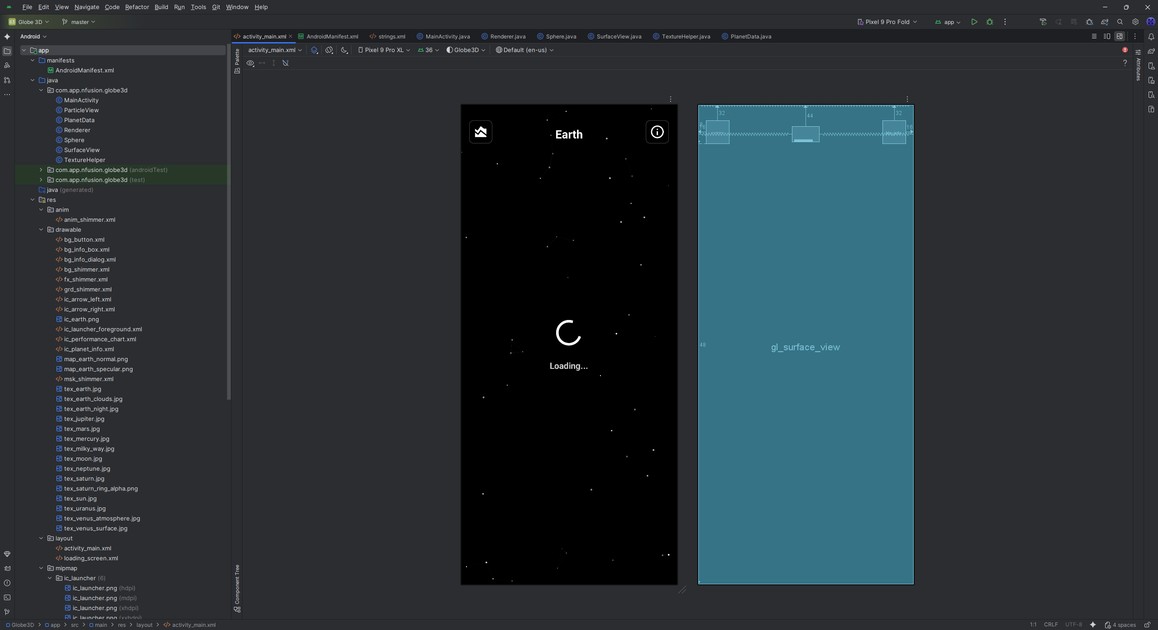
Android Studio and App Class Structure
Component Flow
MainActivity
    ├── SurfaceView (OpenGL rendering surface)
    │   └── Renderer (3D scene management)
    │       ├── Sphere (Geometry & Shaders)
    │       └── TextureHelper (Texture loading)
    ├── ParticleView (Loading animation)
    └── UI Components (Buttons, Dialogs, TextViews)
OpenGL ES Setup
Initializing OpenGL Context
We create a custom SurfaceView that extends GLSurfaceView to control the OpenGL context. We request OpenGL ES 3.0+ to use modern shader-based rendering and features like multiple texture units and better performance.
We set the render mode to RENDERMODE_CONTINUOUSLY so the scene updates every frame, which is needed for smooth animations. The renderer implements the GLSurfaceView.Renderer interface, which provides lifecycle callbacks: onSurfaceCreated (initialization), onSurfaceChanged (viewport updates), and onDrawFrame (per-frame rendering).
In SurfaceView.java, we set up OpenGL ES 3.2:
private void init(Context context) {
    renderer = new com.app.nfusion.globe3d.Renderer(context);
    setEGLContextClientVersion(3);  // Use OpenGL ES 3.0+
    setRenderer(renderer);
    setRenderMode(GLSurfaceView.RENDERMODE_CONTINUOUSLY);  // Continuous rendering
    // ... gesture detectors
}
Explanation:
- setEGLContextClientVersion(3) requests OpenGL ES 3.0+ (supports GLES32)
- RENDERMODE_CONTINUOUSLY renders every frame (60 FPS)
- The renderer implements GLSurfaceView.Renderer with onSurfaceCreated, onSurfaceChanged, and onDrawFrame
OpenGL State Initialization
In onSurfaceCreated(), we set the clear color to black for space. We enable depth testing so closer objects occlude farther ones. We enable blending for transparency (e.g., clouds) and set the blend function to standard alpha blending.
We initialize the Sphere object here because it needs an active OpenGL context to compile shaders and create buffers. We load textures here since they must be uploaded to the GPU on the OpenGL thread, and this callback runs on that thread.
In Renderer.java, sets up OpenGL:
@Override
public void onSurfaceCreated(GL10 gl, EGLConfig config) {
    GLES32.glClearColor(0.0f, 0.0f, 0.0f, 1.0f);  // Black background
    GLES32.glEnable(GLES32.GL_DEPTH_TEST);         // Enable depth testing
    GLES32.glEnable(GLES32.GL_BLEND);              // Enable blending
    GLES32.glBlendFunc(GLES32.GL_SRC_ALPHA, GLES32.GL_ONE_MINUS_SRC_ALPHA);

    sphere = new Sphere();
    sphere.init();  // Initialize sphere geometry and shaders

    // Load all textures
    sunTexture = TextureHelper.loadTexture(context, R.drawable.tex_sun);
    // ... load other textures
}
Explanation:
- glClearColor() sets the clear color
- GL_DEPTH_TEST enables Z-buffering
- GL_BLEND enables transparency (e.g., clouds)
- glBlendFunc() sets alpha blending
3D Sphere Geometry Generation
Generating Sphere Vertices
We generate a sphere using spherical coordinates (latitude and longitude) to create a regular grid. We use 120 divisions in each direction for smooth surfaces without excessive triangles.
We convert spherical coordinates to Cartesian (x, y, z) for OpenGL. We compute texture coordinates (u, v) by normalizing longitude and latitude, mapping the sphere surface to a 2D texture. For a unit sphere, normals equal the vertex positions, which simplifies lighting.
We store vertices, texture coordinates, and normals in separate arrays for efficient GPU upload. We generate triangle indices to form a triangle strip or indexed triangles, reducing vertex duplication.
In Sphere.java, generateSphere() creates a sphere mesh:
private static final int LATITUDE_BANDS = 120;   // Horizontal divisions
private static final int LONGITUDE_BANDS = 120;  // Vertical divisions


private void generateSphere() {
    // Calculate vertex count
    int numVertices = (LATITUDE_BANDS + 1) * (LONGITUDE_BANDS + 1);

    // Allocate buffers
    float[] vertices = new float[numVertices * 3];  // x, y, z
    float[] texCoords = new float[numVertices * 2];  // u, v
    float[] normals = new float[numVertices * 3];    // nx, ny, nz

    int index = 0;
    for (int lat = 0; lat <= LATITUDE_BANDS; lat++) {
        double theta = lat * Math.PI / LATITUDE_BANDS;  // 0 to π
        double sinTheta = Math.sin(theta);
        double cosTheta = Math.cos(theta);

        for (int lon = 0; lon <= LONGITUDE_BANDS; lon++) {
            double phi = lon * 2 * Math.PI / LONGITUDE_BANDS;  // 0 to 2π
            double sinPhi = Math.sin(phi);
            double cosPhi = Math.cos(phi);

            // Calculate vertex position (spherical coordinates to Cartesian)
            float x = (float) (cosPhi * sinTheta);
            float y = (float) cosTheta;
            float z = (float) (sinPhi * sinTheta);

            vertices[index * 3] = x;
            vertices[index * 3 + 1] = y;
            vertices[index * 3 + 2] = z;

            // Texture coordinates (UV mapping)
            texCoords[index * 2] = (float) lon / LONGITUDE_BANDS;
            texCoords[index * 2 + 1] = (float) lat / LATITUDE_BANDS;

            // Normal vector (same as position for unit sphere)
            normals[index * 3] = x;
            normals[index * 3 + 1] = y;
            normals[index * 3 + 2] = z;

            index++;
        }
    }

    // Generate triangle indices
    // ... (creates triangles from vertices)
}
Explanation:
- Spherical coordinates: theta (latitude), phi (longitude)
- Converts to Cartesian: x = cos(φ) * sin(θ), y = cos(θ), z = sin(φ) * sin(θ)
- UV mapping: u = longitude / LONGITUDE_BANDS, v = latitude / LATITUDE_BANDS
- Normals equal position for a unit sphere
Uploading to GPU
We convert Java arrays to FloatBuffer because OpenGL expects native-ordered byte buffers. We use ByteBuffer.allocateDirect() to allocate native memory, avoiding JVM heap copies. We set byte order to native order for compatibility.
We create a GPU buffer with glGenBuffers and bind it to GL_ARRAY_BUFFER. We upload data with glBufferData using GL_STATIC_DRAW since the geometry doesn't change. This keeps geometry data on the GPU for fast access during rendering.
// Convert to FloatBuffer for OpenGL
ByteBuffer vbb = ByteBuffer.allocateDirect(vertices.length * 4);
vbb.order(ByteOrder.nativeOrder());
vertexBuffer = vbb.asFloatBuffer();
vertexBuffer.put(vertices);
vertexBuffer.position(0);


// Create OpenGL buffer
int[] buffers = new int[1];
GLES32.glGenBuffers(1, buffers, 0);
GLES32.glBindBuffer(GLES32.GL_ARRAY_BUFFER, buffers[0]);
GLES32.glBufferData(GLES32.GL_ARRAY_BUFFER,
                    vertices.length * 4,
                    vertexBuffer,
                    GLES32.GL_STATIC_DRAW);
Shader Programming
Vertex Shader (Earth)
The vertex shader transforms vertices from model space to screen space. We pass the Model-View-Projection (MVP) matrix as a uniform so the CPU can compute it once per object. We pass texture coordinates and normals as attributes, and output them as varyings for interpolation in the fragment shader.
We transform normals using the model matrix (not MVP) to keep them in world space for lighting. We pass the world-space position to the fragment shader for view-dependent effects like specular highlights.
In Sphere.java, the Earth vertex shader:
uniform mat4 uMVPMatrix;      // Model-View-Projection matrix
uniform mat4 uModelMatrix;    // Model matrix for normal transformation
attribute vec4 aPosition;      // Vertex position
attribute vec2 aTexCoord;      // Texture coordinates
attribute vec3 aNormal;        // Vertex normal


varying vec2 vTexCoord;        // Pass to fragment shader
varying vec3 vNormal;          // Transformed normal
varying vec3 vPosition;        // World position


void main() {
    gl_Position = uMVPMatrix * aPosition;
    vTexCoord = aTexCoord;
    vNormal = normalize(mat3(uModelMatrix) * aNormal);
    vPosition = vec3(uModelMatrix * aPosition);
}
Explanation:
- uMVPMatrix transforms from model to screen space
- uModelMatrix transforms normals to world space
- Varyings are interpolated per fragment
Fragment Shader (Earth with Lighting)
We sample multiple textures (day, night, clouds, specular, normal) to combine effects. We rotate the cloud texture coordinates to animate clouds independently.
We compute lighting using the dot product between the normal and light direction. We blend day and night textures based on this dot product to simulate day/night. We use a normal map to add surface detail without extra geometry.
We compute specular highlights using the reflection vector and view direction for realistic shine. We blend clouds over the lit surface using the cloud texture alpha channel, with a configurable alpha multiplier.
precision mediump float;


uniform sampler2D uEarthTexture;        // Day texture
uniform sampler2D uEarthNightTexture;   // Night texture
uniform sampler2D uCloudTexture;        // Cloud texture
uniform sampler2D uSpecularTexture;     // Specular map
uniform sampler2D uNormalTexture;       // Normal map
uniform float uCloudRotation;           // Cloud rotation angle
uniform float uCloudAlpha;              // Cloud transparency


varying vec2 vTexCoord;
varying vec3 vNormal;
varying vec3 vPosition;


void main() {
    // Rotate cloud texture
    float rotationOffset = uCloudRotation / 360.0;
    float rotatedU = mod(vTexCoord.x + rotationOffset, 1.0);
    vec2 rotatedCoord = vec2(rotatedU, vTexCoord.y);

    // Sample textures
    vec4 earthColor = texture2D(uEarthTexture, vTexCoord);
    vec4 nightColor = texture2D(uEarthNightTexture, vTexCoord);
    vec4 cloudSample = texture2D(uCloudTexture, rotatedCoord);
    vec4 specularSample = texture2D(uSpecularTexture, vTexCoord);
    vec3 normalMap = texture2D(uNormalTexture, vTexCoord).rgb * 2.0 - 1.0;

    // Calculate lighting
    vec3 lightDir = normalize(uLightDirection);
    vec3 normal = normalize(vNormal + normalMap * 0.3);
    float NdotL = max(dot(normal, lightDir), 0.0);

    // Blend day/night based on lighting
    vec3 dayColor = earthColor.rgb;
    vec3 nightColorRGB = nightColor.rgb * 0.3;  // Dimmer night side
    vec3 litColor = mix(nightColorRGB, dayColor, NdotL);

    // Add specular highlights
    vec3 viewDir = normalize(-vPosition);
    vec3 reflectDir = reflect(-lightDir, normal);
    float spec = pow(max(dot(viewDir, reflectDir), 0.0), 32.0);
    litColor += specularSample.rgb * spec * 0.5;

    // Blend clouds
    float cloudMask = cloudSample.r;
    float blendFactor = cloudMask * uCloudAlpha;
    vec3 finalColor = mix(litColor, vec3(cloudMask), blendFactor);

    gl_FragColor = vec4(finalColor, earthColor.a);
}
Explanation:
- Day/night blending via NdotL
- Normal mapping perturbs normals
- Specular highlights from reflection
- Cloud blending with rotation
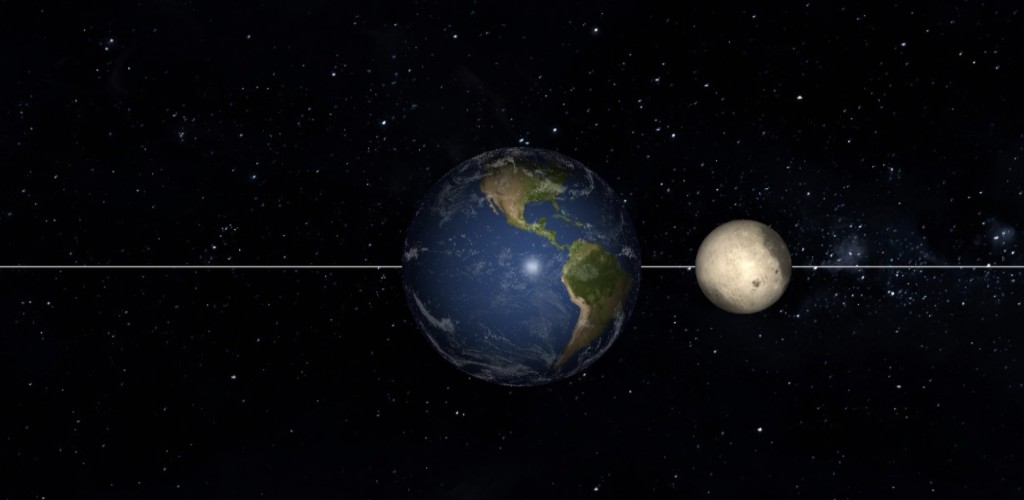
Screenshot of earth with shader and normal map
Compiling Shaders
We compile shaders at runtime to catch errors early and allow dynamic shader generation. We check compilation status and log errors for debugging. We create a program by attaching vertex and fragment shaders, then link it. We check the link status because linking can fail even if compilation succeeds (e.g., mismatched varyings). We store the program ID to use during rendering.
private int loadShader(int type, String shaderCode) {
    int shader = GLES32.glCreateShader(type);
    GLES32.glShaderSource(shader, shaderCode);
    GLES32.glCompileShader(shader);

    // Check compilation status
    int[] compiled = new int[1];
    GLES32.glGetShaderiv(shader, GLES32.GL_COMPILE_STATUS, compiled, 0);
    if (compiled[0] == 0) {
        String error = GLES32.glGetShaderInfoLog(shader);
        throw new RuntimeException("Shader compilation error: " + error);
    }
    return shader;
}


private int createProgram(String vertexShaderCode, String fragmentShaderCode) {
    int vertexShader = loadShader(GLES32.GL_VERTEX_SHADER, vertexShaderCode);
    int fragmentShader = loadShader(GLES32.GL_FRAGMENT_SHADER, fragmentShaderCode);

    int program = GLES32.glCreateProgram();
    GLES32.glAttachShader(program, vertexShader);
    GLES32.glAttachShader(program, fragmentShader);
    GLES32.glLinkProgram(program);

    // Check linking status
    int[] linked = new int[1];
    GLES32.glGetProgramiv(program, GLES32.GL_LINK_STATUS, linked, 0);
    if (linked[0] == 0) {
        String error = GLES32.glGetProgramInfoLog(program);
        throw new RuntimeException("Program linking error: " + error);
    }

    return program;
}
Texture Loading System
TextureHelper Class
We create a utility class to centralize texture loading and reuse it across the app. We generate a texture ID with glGenTextures to get a GPU handle. We set inScaled = false to prevent Android from scaling images, preserving original resolution.
We bind the texture before setting parameters so they apply to the correct texture. We set GL_REPEAT for seamless wrapping. We use GL_LINEAR_MIPMAP_LINEAR for minification to reduce aliasing when zoomed out, and GL_LINEAR for magnification.
We upload the texture with GLUtils.texImage2D, which handles Android bitmap format conversion. We generate mipmaps to provide pre-filtered lower-resolution versions for better quality at distance.
In TextureHelper.java:
public static int loadTexture(Context context, int resourceId) {
    final int[] textureHandle = new int[1];
    GLES32.glGenTextures(1, textureHandle, 0);  // Generate texture ID

    if (textureHandle[0] != 0) {
        // Load bitmap from resources
        BitmapFactory.Options options = new BitmapFactory.Options();
        options.inScaled = false;  // Don't scale, use original size
        Bitmap bitmap = BitmapFactory.decodeResource(context.getResources(), resourceId, options);

        // Bind texture
        GLES32.glBindTexture(GLES32.GL_TEXTURE_2D, textureHandle[0]);

        // Set texture parameters
        GLES32.glTexParameteri(GLES32.GL_TEXTURE_2D, GLES32.GL_TEXTURE_WRAP_S, GLES32.GL_REPEAT);
        GLES32.glTexParameteri(GLES32.GL_TEXTURE_2D, GLES32.GL_TEXTURE_WRAP_T, GLES32.GL_REPEAT);
        GLES32.glTexParameteri(GLES32.GL_TEXTURE_2D, GLES32.GL_TEXTURE_MIN_FILTER, GLES32.GL_LINEAR_MIPMAP_LINEAR);
        GLES32.glTexParameteri(GLES32.GL_TEXTURE_2D, GLES32.GL_TEXTURE_MAG_FILTER, GLES32.GL_LINEAR);

        // Upload texture data
        GLUtils.texImage2D(GLES32.GL_TEXTURE_2D, 0, bitmap, 0);
        GLES32.glGenerateMipmap(GLES32.GL_TEXTURE_2D);  // Generate mipmaps

        bitmap.recycle();  // Free memory
    }

    return textureHandle[0];
}
Explanation:
- glGenTextures() allocates a texture ID
- inScaled = false prevents Android scaling
- GL_REPEAT for seamless wrapping
- GL_LINEAR_MIPMAP_LINEAR for filtering
- glGenerateMipmap() creates mipmaps
High-Quality Texture Loading
For planets, we disable mipmaps to always use full resolution when zooming. We set base and max mipmap levels to 0 to force the base level. We use GL_LINEAR for both min and mag filters to always sample the full-resolution texture.
We enable anisotropic filtering if available to improve quality at oblique angles. We check for the extension first since it's optional. We set the anisotropy level based on device support, capped at 16x for performance.
public static int loadHighQualityTexture(Context context, int resourceId) {
    // ... similar setup ...

    // Disable mipmaps for maximum quality
    GLES32.glTexParameteri(GLES32.GL_TEXTURE_2D, GLES32.GL_TEXTURE_BASE_LEVEL, 0);
    GLES32.glTexParameteri(GLES32.GL_TEXTURE_2D, GLES32.GL_TEXTURE_MAX_LEVEL, 0);
    GLES32.glTexParameteri(GLES32.GL_TEXTURE_2D, GLES32.GL_TEXTURE_MIN_FILTER, GLES32.GL_LINEAR);
    GLES32.glTexParameteri(GLES32.GL_TEXTURE_2D, GLES32.GL_TEXTURE_MAG_FILTER, GLES32.GL_LINEAR);

    // Enable anisotropic filtering if available
    // ... (checks for extension and applies)

    GLUtils.texImage2D(GLES32.GL_TEXTURE_2D, 0, bitmap, 0);
    // NO mipmap generation - always use full resolution
}
Rendering Pipeline
Main Render Loop
We track FPS by counting frames over 1-second intervals. We clear the color and depth buffers each frame to remove previous frame data. We update rotation angles every frame for smooth animation, and update orbital positions to simulate planetary motion.
We handle camera transitions separately to interpolate smoothly between targets. We calculate the camera position using spherical coordinates (azimuth, elevation, distance) relative to the target, which provides intuitive orbit-style control.
We use Matrix.setLookAtM to build the view matrix from camera position, target, and up vector. We compute the MVP matrix by multiplying projection, view, and model matrices. We draw the background first so planets render on top, then draw orbit paths, then celestial bodies in order from the Sun outward.
In Renderer.java, onDrawFrame() runs every frame:
@Override
public void onDrawFrame(GL10 gl) {
    // Track FPS
    frameCount++;
    long currentTime = System.currentTimeMillis();
    if (currentTime - lastFpsTime >= 1000) {
        currentFps = frameCount;
        frameCount = 0;
        lastFpsTime = currentTime;
    }

    // Clear screen
    GLES32.glClear(GLES32.GL_COLOR_BUFFER_BIT | GLES32.GL_DEPTH_BUFFER_BIT);

    // Update rotations
    updateSunRotation();
    updateEarthRotation();
    // ... update all planets

    // Update orbits
    updateEarthOrbit();
    // ... update all orbits

    // Handle camera transitions
    if (isTransitioning) {
        updateTransition();
    }

    // Calculate camera position
    float[] targetPos = getCameraTargetPosition();
    float cameraDistance = baseCameraDistance / zoomScale;

    // Calculate camera position using spherical coordinates
    float x = targetPos[0] + (float)(cameraDistance * Math.cos(cameraElevation) * Math.sin(cameraAzimuth));
    float y = targetPos[1] + (float)(cameraDistance * Math.sin(cameraElevation));
    float z = targetPos[2] + (float)(cameraDistance * Math.cos(cameraElevation) * Math.cos(cameraAzimuth));

    // Set up view matrix (camera)
    Matrix.setLookAtM(earthViewMatrix, 0,
            x, y, z,                    // Camera position
            targetPos[0], targetPos[1], targetPos[2],  // Look at target
            0, 1, 0);                   // Up vector

    // Calculate MVP matrix
    Matrix.multiplyMM(mvpMatrix, 0, earthProjectionMatrix, 0, earthViewMatrix, 0);

    // Draw background
    drawBackground();

    // Draw orbit paths
    drawOrbitPaths();

    // Draw all celestial bodies
    drawSun();
    drawMercury();
    drawVenus();
    drawEarth();
    drawMoon();
    // ... draw other planets
}
Drawing a Planet
We calculate the planet's orbital position using the current orbit angle and radius. We build the model matrix by first translating to the orbital position, then rotating around the Y-axis for the planet's rotation, then scaling to the planet's size. This order ensures rotation happens at the planet's center.
We compute the MVP matrix by multiplying projection, view, and model matrices. We pass the model matrix separately to the shader for normal transformation. We call the sphere's draw method with all required textures and uniforms, using the appropriate shader program for each planet type.
Example: drawEarth()
private void drawEarth() {
    // Calculate Earth's position in orbit
    float orbitX = (float)(earthOrbitRadius * Math.cos(earthOrbitAngle));
    float orbitZ = (float)(earthOrbitRadius * Math.sin(earthOrbitAngle));

    // Build model matrix (position + rotation + scale)
    Matrix.setIdentityM(earthModelMatrix, 0);
    Matrix.translateM(earthModelMatrix, 0, orbitX, 0, orbitZ);
    Matrix.rotateM(earthModelMatrix, 0, earthAngle * 57.2958f, 0, 1, 0);  // Rotate around Y-axis
    Matrix.scaleM(earthModelMatrix, 0, earthScaleFactor, earthScaleFactor, earthScaleFactor);

    // Calculate final MVP matrix
    float[] modelViewMatrix = new float[16];
    Matrix.multiplyMM(modelViewMatrix, 0, earthViewMatrix, 0, earthModelMatrix, 0);
    Matrix.multiplyMM(modelViewMatrix, 0, earthProjectionMatrix, 0, modelViewMatrix, 0);

    // Draw sphere with Earth shader
    sphere.drawEarth(earthTexture, earthNightTexture, earthCloudTexture,
                     earthSpecularTexture, earthNormalTexture,
                     cloudAngle, cloudAlpha, modelViewMatrix, earthModelMatrix,
                     lightDirection, lightColor);
}
Explanation:
- Model matrix: translate → rotate → scale
- MVP = Projection × View × Model
- Shader uses textures and lighting uniforms
Touch & Gesture Handling
Custom SurfaceView
We extend GLSurfaceView to handle touch events on the OpenGL thread. We use GestureDetector and ScaleGestureDetector to recognize gestures. We check pointer count first to prioritize multi-touch (pinch-to-zoom) over single-touch (rotation).
On ACTION_DOWN, we store initial touch coordinates to detect taps vs. drags. On ACTION_MOVE, we calculate deltas and update camera angles. We use a sensitivity multiplier to tune rotation speed. We wrap azimuth to keep it in a valid range and clamp elevation to prevent flipping.
We use queueEvent to update the renderer on the OpenGL thread, avoiding thread safety issues. On ACTION_UP, we check total movement to distinguish taps from drags. If movement is minimal and no swipe occurred, we toggle pause.
In SurfaceView.java, we handle touch events:
@Override
public boolean onTouchEvent(MotionEvent e) {
    int action = e.getActionMasked();
    int pointerCount = e.getPointerCount();

    // Handle multi-touch (pinch-to-zoom)
    boolean scaleHandled = scaleGestureDetector.onTouchEvent(e);
    boolean swipeHandled = swipeGestureDetector.onTouchEvent(e);

    if (pointerCount > 1 || scaleGestureDetector.isInProgress()) {
        isDragging = false;
        return true;  // Multi-touch handled
    }

    switch (action) {
        case MotionEvent.ACTION_DOWN:
            initialTouchX = e.getX(0);
            initialTouchY = e.getY(0);
            lastTouchX = initialTouchX;
            lastTouchY = initialTouchY;
            isDragging = true;
            return true;

        case MotionEvent.ACTION_MOVE:
            if (isDragging) {
                float deltaX = e.getX(0) - lastTouchX;
                float deltaY = e.getY(0) - lastTouchY;

                // Update camera angles
                orbitAzimuth = wrapAngle(orbitAzimuth - (deltaX * ORBIT_TOUCH_SCALE));
                orbitElevation = clampElevation(orbitElevation + (deltaY * ORBIT_TOUCH_SCALE));

                // Update renderer (on OpenGL thread)
                queueEvent(() -> renderer.setCameraAngles(orbitAzimuth, orbitElevation));

                lastTouchX = e.getX(0);
                lastTouchY = e.getY(0);
                return true;
            }
            break;

        case MotionEvent.ACTION_UP:
            isDragging = false;
            // Check if tap (minimal movement)
            float totalMovement = (float)Math.sqrt(
                (e.getX(0) - initialTouchX) * (e.getX(0) - initialTouchX) +
                (e.getY(0) - initialTouchY) * (e.getY(0) - initialTouchY)
            );
            if (totalMovement < TAP_THRESHOLD && !swipeHandled) {
                queueEvent(() -> renderer.togglePause());  // Toggle pause
            }
            return true;
    }

    return scaleHandled || swipeHandled || isDragging;
}
Explanation:
- Single touch: drag to rotate camera
- Multi-touch: pinch-to-zoom via ScaleGestureDetector
- Tap: toggle pause
- Swipe: switch planets via GestureDetector
Pinch-to-Zoom
We use ScaleGestureDetector to detect pinch gestures. The scale factor is relative to the previous scale event, so we multiply it with the current zoom level. We clamp the zoom scale to min/max values to prevent extreme zoom levels. We update the renderer on the OpenGL thread using queueEvent.
private class ScaleListener extends ScaleGestureDetector.SimpleOnScaleGestureListener {
    @Override
    public boolean onScale(ScaleGestureDetector detector) {
        final float scaleFactor = detector.getScaleFactor();
        queueEvent(() -> renderer.scaleSphere(scaleFactor));
        return true;
    }
}
In Renderer.java:
public synchronized void scaleSphere(float scaleFactor) {
    zoomScale *= scaleFactor;
    zoomScale = Math.max(minScale, Math.min(maxScale, zoomScale));
}
Swipe Gesture Detection
We detect horizontal swipes by comparing X and Y movement. We check both distance and velocity thresholds to avoid accidental swipes. We check if the touch started and ended on empty space (not on a planet) to avoid conflicts with rotation. We cycle the camera target forward or backward based on swipe direction. We notify the listener to hide the hint when a swipe is detected.
private class SwipeGestureListener extends GestureDetector.SimpleOnGestureListener {
    @Override
    public boolean onFling(MotionEvent e1, MotionEvent e2, float velocityX, float velocityY) {
        float diffX = e2.getX() - e1.getX();

        // Horizontal swipe
        if (Math.abs(diffX) > Math.abs(diffY)) {
            if (Math.abs(diffX) > SWIPE_THRESHOLD &&
                Math.abs(velocityX) > SWIPE_VELOCITY_THRESHOLD) {
                boolean swipeLeft = diffX > 0;
                queueEvent(() -> renderer.cycleCameraTarget(swipeLeft));

                // Hide hint
                if (swipeListener != null) {
                    post(() -> swipeListener.onSwipeDetected());
                }
                return true;
            }
        }
        return false;
    }
}
UI Components & Layout
Main Layout Structure
We use a RelativeLayout to overlay UI elements on the OpenGL surface. The SurfaceView fills the screen as the background. We use include for the loading screen to keep the layout modular.
We position the planet name at the top center using layout_alignParentTop and layout_centerHorizontal. We add elevation and shadow for visibility over the 3D scene. We place buttons at the top corners using alignment attributes.
We create the info dialog as a full-screen overlay with a semi-transparent background. We use a FrameLayout for the overlay and center the content container. We make the container clickable to prevent clicks from passing through to the background.
We position the swipe hint at the bottom center, initially hidden, and show it conditionally based on launch count.
In activity_main.xml:
<RelativeLayout>
    <!-- OpenGL Surface (background) -->
    <com.app.nfusion.globe3d.SurfaceView
        android:id="@+id/gl_surface_view"
        android:layout_width="match_parent"
        android:layout_height="match_parent" />

    <!-- Loading Screen Overlay -->
    <include layout="@layout/loading_screen" />

    <!-- Planet Name (Top Center) -->
    <TextView
        android:id="@+id/tv_planet_name"
        android:layout_alignParentTop="true"
        android:layout_centerHorizontal="true"
        android:textColor="#FFFFFF"
        android:textSize="24sp"
        android:textStyle="bold" />

    <!-- Performance Button (Top Left) -->
    <ImageButton
        android:id="@+id/btn_performance"
        android:layout_alignParentStart="true"
        android:layout_alignParentTop="true"
        android:src="@drawable/ic_performance_chart" />

    <!-- Info Button (Top Right) -->
    <ImageButton
        android:id="@+id/btn_info"
        android:layout_alignParentTop="true"
        android:layout_alignParentEnd="true"
        android:src="@drawable/ic_planet_info" />

    <!-- Info Dialog (Overlay) -->
    <FrameLayout
        android:id="@+id/info_dialog"
        android:background="#E0000000"
        android:visibility="gone">
        <!-- Dialog content -->
    </FrameLayout>

    <!-- Swipe Hint -->
    <LinearLayout
        android:id="@+id/swipe_hint_container"
        android:layout_alignParentBottom="true"
        android:layout_centerHorizontal="true"
        android:visibility="gone">
        <!-- Hint text and arrows -->
    </LinearLayout>
</RelativeLayout>
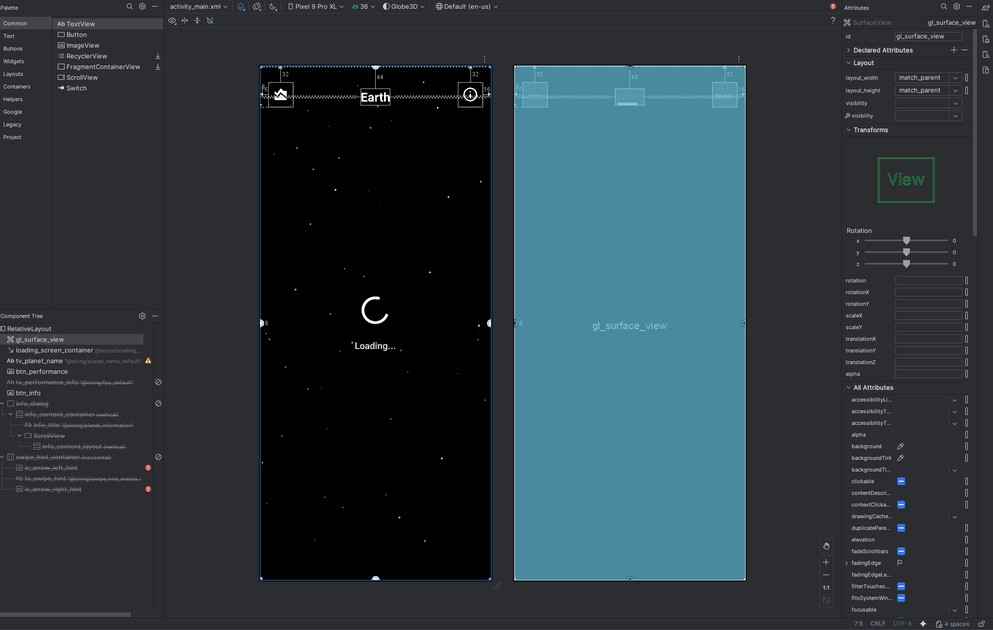
XML Layout
UI Initialization
We hide UI elements during loading to avoid showing incomplete data. We use post to access the renderer after the view is attached, since the renderer is created in the view's initialization.
We set a loading callback on the renderer to know when textures are loaded. We animate the loading screen fade-out for a smooth transition. We show UI elements only after loading completes to ensure the renderer is ready.
We use a Handler with a Runnable to update the planet name periodically, since the renderer runs on a separate thread. We set click listeners on buttons to toggle dialogs and update content dynamically.
In MainActivity.java:
@Override
protected void onCreate(Bundle savedInstanceState) {
    super.onCreate(savedInstanceState);
    setContentView(R.layout.activity_main);

    // Initialize views
    glSurfaceView = findViewById(R.id.gl_surface_view);
    tvPlanetName = findViewById(R.id.tv_planet_name);
    btnInfo = findViewById(R.id.btn_info);
    btnPerformance = findViewById(R.id.btn_performance);
    infoDialog = findViewById(R.id.info_dialog);

    // Hide UI during loading
    tvPlanetName.setVisibility(View.GONE);
    btnInfo.setVisibility(View.GONE);
    btnPerformance.setVisibility(View.GONE);

    // Set up renderer callback
    glSurfaceView.post(() -> {
        renderer = (Renderer) glSurfaceView.getRenderer();
        if (renderer != null) {
            renderer.setLoadingCallback(() -> {
                // Hide loading screen
                loadingScreen.animate()
                    .alpha(0.0f)
                    .setDuration(500)
                    .withEndAction(() -> {
                        loadingScreen.setVisibility(View.GONE);
                        // Show UI elements
                        tvPlanetName.setVisibility(View.VISIBLE);
                        btnInfo.setVisibility(View.VISIBLE);
                        btnPerformance.setVisibility(View.VISIBLE);
                    })
                    .start();
            });
        }
    });

    // Update planet name periodically
    handler.post(updatePlanetNameRunnable);

    // Button listeners
    btnInfo.setOnClickListener(v -> {
        if (infoDialog.getVisibility() == View.VISIBLE) {
            infoDialog.setVisibility(View.GONE);
        } else {
            updatePlanetInfo();
            infoDialog.setVisibility(View.VISIBLE);
        }
    });
}
Loading Screen & Particle Animation
ParticleView Implementation
We create a custom View that draws particles directly on a Canvas for a lightweight loading animation. We use a fixed particle count to balance visual quality and performance.
We update particle positions each frame based on velocity. We normalize delta time to 60 FPS to keep animation speed consistent across devices. We wrap particles at screen edges for a continuous effect.
We draw connections between nearby particles to create a network effect. We calculate distance between particles and draw lines only if they're close enough. We fade line alpha based on distance for a smooth gradient effect.
We call invalidate() after drawing to request the next frame, creating a continuous animation loop. We stop the animation when loading completes to save resources.
In ParticleView.java:
public class ParticleView extends View {
    private static final int PARTICLE_COUNT = 50;
    private List<Particle> particles;
    private Paint paint;

    @Override
    protected void onDraw(Canvas canvas) {
        long currentTime = System.currentTimeMillis();
        float deltaTime = (currentTime - lastUpdateTime) / 16.67f;  // Normalize to 60fps

        // Update and draw particles
        for (Particle particle : particles) {
            // Update position
            particle.x += particle.speedX * deltaTime;
            particle.y += particle.speedY * deltaTime;

            // Wrap around edges
            if (particle.x < 0) particle.x = getWidth();
            if (particle.x > getWidth()) particle.x = 0;
            if (particle.y < 0) particle.y = getHeight();
            if (particle.y > getHeight()) particle.y = 0;

            // Draw particle
            paint.setAlpha((int)(255 * particle.alpha));
            canvas.drawCircle(particle.x, particle.y, particle.size, paint);
        }

        // Draw connections between nearby particles
        drawConnections(canvas);

        if (isAnimating) {
            invalidate();  // Request redraw
        }
    }

    private void drawConnections(Canvas canvas) {
        float maxDistance = 150.0f;
        for (int i = 0; i < particles.size(); i++) {
            for (int j = i + 1; j < particles.size(); j++) {
                Particle p1 = particles.get(i);
                Particle p2 = particles.get(j);
                float distance = (float)Math.sqrt(
                    (p2.x - p1.x) * (p2.x - p1.x) +
                    (p2.y - p1.y) * (p2.y - p1.y)
                );

                if (distance < maxDistance) {
                    float alpha = (1.0f - distance / maxDistance) * 0.3f;
                    paint.setAlpha((int)(255 * alpha));
                    canvas.drawLine(p1.x, p1.y, p2.x, p2.y, paint);
                }
            }
        }
    }
}
Explanation:
- Particles move and wrap at edges
- Lines connect nearby particles
- invalidate() triggers redraw
Planet Information System
PlanetData Class
We use a data class to store planet information in a structured way. We use static factory methods for each planet to centralize data and make it easy to add new planets. We load strings from resources to support localization and keep data separate from code.
We include physical properties (mass, diameter, gravity), orbital properties (period, speed, eccentricity), atmospheric data, and exploration history for educational value.
In PlanetData.java, static methods return planet data:
public static PlanetData getEarth(Context context) {
    PlanetData data = new PlanetData();
    data.name = context.getString(R.string.earth_name);
    data.mass = context.getString(R.string.earth_mass);
    data.diameter = context.getString(R.string.earth_diameter);
    // ... set all properties
    return data;
}
Dynamic Info Dialog
We determine which planet to show based on the renderers current camera target, keeping UI in sync with the 3D scene. We use a switch expression to select the appropriate data, with Earth as the default.
We clear previous content before adding new content to avoid duplication. We organize information into sections with headers for readability. We create info rows dynamically using LinearLayout and TextView to avoid hardcoding layouts.
We use equal-weight layout params for label and value boxes so they share width equally. We match the box heights after layout completes, since text height isn't known until measurement. We use a retry mechanism with post to handle cases where layout isn't complete immediately.
We set the dialog height to half the screen height to balance visibility and screen space. We center the dialog vertically for better visual balance.
In MainActivity.java, updatePlanetInfo() builds the dialog:
private void updatePlanetInfo() {
    if (renderer == null) return;

    // Get planet data based on current camera target
    int target = renderer.getCameraTarget();
    PlanetData data = switch (target) {
        case 0 -> PlanetData.getSun(this);
        case 1 -> PlanetData.getMercury(this);
        case 2 -> PlanetData.getVenus(this);
        case 4 -> PlanetData.getMoon(this);
        // ... other planets
        default -> PlanetData.getEarth(this);
    };

    // Clear previous content
    infoContentLayout.removeAllViews();

    // Add section headers and info rows
    addSectionBox(getString(R.string.section_essential_physical), ...);
    addInfoRow(getString(R.string.label_mass), data.mass, ...);
    addInfoRow(getString(R.string.label_diameter), data.diameter, ...);
    // ... add all properties
}


private void addInfoRow(String label, String value, LinearLayout parent, Drawable background) {
    LinearLayout rowLayout = new LinearLayout(this);
    rowLayout.setOrientation(LinearLayout.HORIZONTAL);

    // Create label TextView
    TextView labelView = new TextView(this);
    labelView.setText(label);
    labelView.setBackground(background);
    // ... set layout params

    // Create value TextView
    TextView valueView = new TextView(this);
    valueView.setText(value);
    valueView.setBackground(background);
    // ... set layout params

    rowLayout.addView(labelView);
    rowLayout.addView(valueView);
    parent.addView(rowLayout);

    // Match heights after layout
    rowLayout.post(() -> {
        int maxHeight = Math.max(labelView.getHeight(), valueView.getHeight());
        // Update layout params to match heights
    });
}
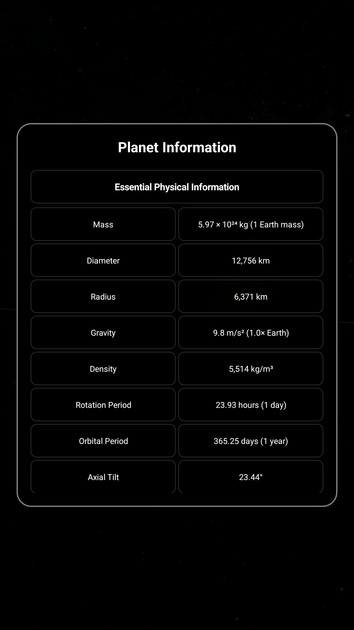
Planet Info Dialog
Camera System & Transitions
Camera Position Calculation
We calculate each planet's position based on its orbit angle and radius. For the Sun, we use the origin (0,0,0). For planets, we use trigonometry to compute X and Z from the orbit angle, keeping Y at 0 for a flat orbital plane.
For the Moon, we calculate its position relative to Earth by adding Earth's orbital position to the Moon's offset from Earth. This creates a nested orbit system.
We return positions as float arrays for easy interpolation during transitions.
In Renderer.java:
private float[] getCameraTargetPosition() {
    return switch (cameraTarget) {
        case 0 -> new float[]{0, 0, 0};  // Sun (center)
        case 1 -> {  // Mercury
            float x = (float)(mercuryOrbitRadius * Math.cos(mercuryOrbitAngle));
            float z = (float)(mercuryOrbitRadius * Math.sin(mercuryOrbitAngle));
            yield new float[]{x, 0, z};
        }
        case 3 -> {  // Earth
            float x = (float)(earthOrbitRadius * Math.cos(earthOrbitAngle));
            float z = (float)(earthOrbitRadius * Math.sin(earthOrbitAngle));
            yield new float[]{x, 0, z};
        }
        case 4 -> {  // Moon (relative to Earth)
            float earthX = (float)(earthOrbitRadius * Math.cos(earthOrbitAngle));
            float earthZ = (float)(earthOrbitRadius * Math.sin(earthOrbitAngle));
            float moonX = (float)(moonOffset * Math.cos(moonOrbitAngle));
            float moonZ = (float)(moonOffset * Math.sin(moonOrbitAngle));
            yield new float[]{earthX + moonX, 0, earthZ + moonZ};
        }
        // ... other planets
    };
}
Smooth Transitions
We store the starting position when a transition begins to interpolate from the current position. We set a transitioning flag to prevent multiple transitions from overlapping.
We cycle the camera target forward or backward based on swipe direction, wrapping around using modulo arithmetic. We reset transition progress to 0 to start the interpolation.
We update transition progress each frame by adding a fixed speed value. We use a sine wave to calculate motion blur intensity, peaking at the middle of the transition for a realistic motion blur effect.
We use smoothstep (ease-in-out) interpolation for the camera position to avoid linear motion. This creates acceleration at the start and deceleration at the end, making the transition feel natural.
We calculate the interpolated position by lerping between start and end positions using the eased progress value. We use this interpolated position for the camera target during transitions.
public synchronized void cycleCameraTarget(boolean swipeLeft) {
    if (!isTransitioning) {
        // Store current position
        float[] currentPos = getCameraTargetPosition();
        transitionStartPos[0] = currentPos[0];
        transitionStartPos[1] = currentPos[1];
        transitionStartPos[2] = currentPos[2];

        // Update target
        isTransitioning = true;
        if (swipeLeft) {
            cameraTarget = (cameraTarget + 1) % 10;
        } else {
            cameraTarget = (cameraTarget + 9) % 10;
        }
        transitionProgress = 0.0f;
    }
}


private synchronized void updateTransition() {
    transitionProgress += TRANSITION_SPEED;
    if (transitionProgress >= 1.0f) {
        transitionProgress = 1.0f;
        isTransitioning = false;
        motionBlurIntensity = 0.0f;
    } else {
        // Calculate motion blur intensity (sine wave)
        motionBlurIntensity = (float)Math.sin(transitionProgress * Math.PI) * 1.2f;
    }
}
During rendering:
// Interpolate camera target position
float[] targetPos;
if (isTransitioning) {
    float[] startPos = transitionStartPos;
    float[] endPos = getCameraTargetPosition();
    float t = transitionProgress;
    // Smooth easing (ease-in-out)
    float easedT = t * t * (3.0f - 2.0f * t);
    targetPos = new float[]{
        startPos[0] + (endPos[0] - startPos[0]) * easedT,
        startPos[1] + (endPos[1] - startPos[1]) * easedT,
        startPos[2] + (endPos[2] - startPos[2]) * easedT
    };
} else {
    targetPos = getCameraTargetPosition();
}
Performance Monitoring
FPS Tracking
We count frames rendered and calculate FPS over 1-second intervals. We reset the counter every second to get an average FPS. We store the current FPS value so the UI can read it without blocking the render thread.
We calculate FPS on the render thread to avoid synchronization overhead. We use System.currentTimeMillis() for timing since it's sufficient for 1-second intervals.
In Renderer.java:
private int frameCount = 0;
private long lastFpsTime = System.currentTimeMillis();
private float currentFps = 60.0f;


@Override
public void onDrawFrame(GL10 gl) {
    frameCount++;
    long currentTime = System.currentTimeMillis();
    if (currentTime - lastFpsTime >= 1000) {
        currentFps = frameCount;
        frameCount = 0;
        lastFpsTime = currentTime;
    }
    // ... rest of rendering
}


public float getFps() {
    return currentFps;
}
Performance Info Display
We calculate triangle count by multiplying vertices per sphere by triangles per vertex. We use 120x120 divisions, which creates 120×120×2 triangles per sphere (each quad is two triangles). We multiply by the number of spheres (Earth, Moon, Sun, Background) for the total.
We calculate memory usage by getting the JVM heap usage and native heap size. We convert bytes to megabytes for readability. We combine Java and native memory to show total app memory usage.
We update the performance info every 100ms to balance responsiveness and CPU usage. We use a Runnable with postDelayed to schedule updates. We only update when the performance info is visible to avoid unnecessary work.
In MainActivity.java:
private final Runnable updatePerformanceInfoRunnable = new Runnable() {
    @Override
    public void run() {
        if (performanceInfoVisible && renderer != null) {
            float fps = renderer.getFps();

            // Calculate triangle count
            int trianglesPerSphere = 120 * 120 * 2;  // 120x120 grid = 28,800 triangles
            int numSpheres = 4;  // Earth, Moon, Sun, Background
            int totalTriangles = trianglesPerSphere * numSpheres;

            // Get memory usage
            Runtime runtime = Runtime.getRuntime();
            long usedMemory = (runtime.totalMemory() - runtime.freeMemory()) / (1024 * 1024);
            long nativeMemory = Debug.getNativeHeapSize() / (1024 * 1024);
            long totalAppMemory = usedMemory + nativeMemory;

            tvPerformanceInfo.setText(String.format(
                getString(R.string.fps_format),
                fps, totalTriangles, totalAppMemory
            ));
            handler.postDelayed(this, 100);  // Update every 100ms
        }
    }
};
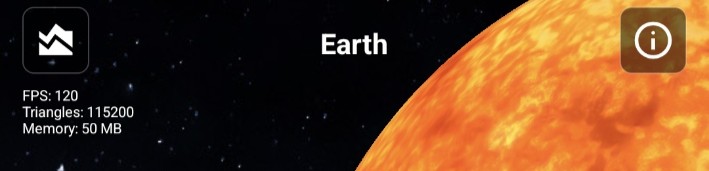
Performance Overlay with FPS, Triangles and Memory Usage of the Device
Key Learning Points
- OpenGL ES 3.2: shaders, buffers, textures, matrices
- 3D math: spherical coordinates, transformations, camera
- Android graphics: custom views, touch handling, animations
- Performance: FPS tracking, memory monitoring, optimization
- Architecture: separation of concerns, callbacks, threading
Conclusion
This tutorial covered:
- OpenGL ES setup and rendering
- 3D geometry generation
- Shader programming
- Touch and gesture handling
- UI components and animations
- Performance monitoring
The demo demonstrates a complete 3D rendering pipeline on Android using OpenGL ES.
The full source code is available on Github and the demo app is available to download from Google Play Store under the link below